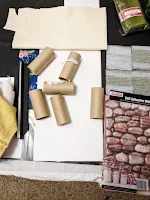
AKA, let's see how far we can stretch the concept of slapdash...
Modular walls round 2. I have a small hoard of backdrop-viable materials anyway and have been putting off making more of them for some unknown reason, but something in the bargain bins at Target caught my eye a few weeks ago.
 |
| iirc these were about $3 each, so not too bad. |
I already had the silicone molds for the bricks and a few other things, and an idea popped into my head on how to make decent use of them. Does anyone else remember a few years back when the craft stores were trying to make hot-glue casting a whole thing? Did I imagine it??
 |
| gotta love how even the promo image admits the texture doesn't tile. |
Got this at the Dollar Tree - it's supposed to be a wall decal, but it works just as well as a floor. It's 3d, of course. I might go over it with some matte varnish, since those stones are awfully shiny.
Our usual Rogues' Gallery of materials, this time involving the addition of toilet paper rolls, scrap felt and some Christmas village grass (still pressed out and flattening as of this post). I cut the foamcore (also scraps) to fit the foliage mats, so they're about 12" wide, give or take, and 24" long.
 |
| not the final product. variations from packaging may occur. |
So the end result should look something like this, but much better since y'know...the bricks will be painted. RIP my hot glue stash at this point, because I made ten of these panels of bricks and there wasn't much wastage. Even not glopping it into the molds it still ate almost all my sticks.
So I got to work gluing the bricks on - each panel only needed four on the front. The extras were for the sides and what would be the centerpiece, because....
 |
Obviously at this size, they either won't meet in the corner, or will leave the edges wide open to break the immersion. I opted to cover the center's sins. Also added that faux ledge across the top to balance things out.
It's just some scrap foamcore wrapped in felt and glued on. The method behind this madness will become apparent eventually, I promise.
This is just four rolls glued together, shored up with craft sticks, and covered in more felt. I banded the ends with more of the hot glue bricks.
99% of the paint colors used. Not pictured is the English Ivy Green, Licorice, or Country Grey used later. Leave it to the store to not have either burnt umber or brick red in stock when I appear.
 |
| base coat acquired. |
A base of 50/50 terracotta and tuscan red, for starters.
 |
| my eyes!! |
A sort of whitewash with vanilla, for the grout. It's blinding.
 |
| much better. |
I went over this with a sort of dark wash of the tuscan red and a little of the dark brown, then asked my roommate to get me some spouncers while he was out (I was at work). Spouncer is such a silly word. Anyway, I then spounced on some tuscan red, and drybrushed with the terracotta to bring out the texture.
General consensus being that the grout was still way too bright, it also got another wash, this time with just the dark brown. Roommate approved, we were ready to go on. The felt parts for painted over with a mix of the vanilla toned down with the country grey, because to my mind painted felt looks a lot like a smooth stucco or molded concrete. Tacked on the foliage mats and...
 |
| should do something about the wall brackets, lol. |
Voila! These are not the most stable things on earth, but the center pillar helps to hold the walls up, so I call it good.
I think it works, more or less. How about you? I'm planning to do something similar on the opposite sides of the wall pieces, but not right this minute. I need a break.


No comments:
Post a Comment