
2023 update - before you get to angrytyping in the comments (because I'm sure someone will), this was all done in 2015, when these dolls were much easier to come by. I had limited financial backing at the time, so no access to nice things like apoxie or better tools. All this was done on a pretty severe budget and was partly just for the sake of experimentation. Numerous much better methods and tutorials have come along in the years since. I personally recommend Dollightful over on Youtube. As I mention below, I didn't crack open any of the rarer or nicer dolls I had. In fact, all the bodies used here ended up with their wounds fused shut anyway. Nothing went to waste aside from maybe half a centimeter of height =p
Or: mad plastic science experiments – what have I wrought myself into?
I think I mentioned (mostly on Tumblr) that the start of 2015 saw me deciding it might be time to attempt doll and figure modification and customizing again. It’d been about fifteen years and I figured ‘hey, by now I should have enough levels in kitbash to actually pull off something decent‘. Considering the mini-painting experience and the fact I now have more than just a hand-me-down exacto, baby nail clippers and a nail file, the assessment holds pretty much true. Naturally, me being me, I jumped in directly to the deep end despite intentions to work my way up to what started the whole mess to begin with – but that tidbit is a story for another time. This particular post is about modding experiments, chutzpah and running afoul of the icebergs of unforeseen complication =p
AS A DISCLAIMER, I can’t in all honesty endorse my own methods, and I won’t be filing this under Tutorials. I don’t come at this from an artisan perspective or with a full working understanding of BJDs or even how this same joint has been constructed in other playline dolls (I have a Style Nikki with a torso joint, but I’m not about to crack her open to take a look at it, and the other candidate is a thrifted gymnast Barbie who’s also an only child – I’m not a total Sid). This right here is a lot of trial and error. I had an idea, figured I’d try it out, and am learning as I go along. None of the materials are professional, none of the bait dolls used are collector editions or otherwise rare, and none of the resulting customs are being sold – they’re either for my personal collection or are being given as gifts to friends. I do not plan to do this for profit, either. Right now, I’m just having fun. That being said, please consider the photos here as reference, and if anyone out there does improve on the methods, do let me know! As far as I know this has only been tried by one other person (who actually is a pro and does know what they’re doing, and sells some epic customs), though Mattel is now producing dolls with torso joints. Apologies for the quality of some of these images; the photos were taken at work with a cell phone camera. Just click them to see ’em full size.
Moving on, I just want to add that after working with more of the full range here, overall I prefer the Ever After High female bodies…mostly because I’m built that way myself. I do understand the Monster High crew are much more stylized – and the ‘little sister’ sized body in that line is actually my favorite; they just fit together better overall somehow – though I do prefer the MH males when it comes to the dude bods. EAH’s guys are a little too…beefcakey for me. I got interested in both doll lines since they (and recent Barbie versions) are much, much more articulated than what I grew up with. They’re not quite complex enough to be BJD level, but it’s awesome that Mattel is stepping up like this to bring that kind of poseability to play quality fashion dolls. The characters in general all seem to have more background and personality than Barbie ever did (for me, anyway. As a kid Barbie for all her amazing life accomplishments kinda bored me when playtime was 99% trying to figure out what she’d wear. Honestly, I was more interested in all her miniature stuff), and the individual face molds on the MH dolls in particular are a great touch. Hats off to you, Mattel.
Body comparisons have been done before (also go check out all of Requiem’s stuff, especially if you’re a Pullip fan. Go. NOW!), but when I decided to take a crack at this..no pun intended…I couldn’t really find any pictures of the torso interiors. Monsters Without Makeup is another great reference, especially for the MH face sculpts, and I did find pictures of the two clear-plastic Create-A-Monster dolls which helped me get an idea in general. At that point it occurred to me that I could probably plot out the attachment points in a CAM body on my own before making any mistakes by just candling the one I had like a farmer would an egg. Holding the body up to a 60-watt light bulb worked so well I totally forgot to take any pictures of the process. Keep in mind this only works with the lighter-colored plastics and is especially effective with MH dolls as their plastic overall is thinner than that used for the EAH dolls (I don’t know why). Also of note is that the boys have thicker plastic overall – I couldn’t get a peek through Hunter at all, try as I might, so had to fly a little blind. Luckily, none of them were fertilized.
The CAM torsos and the regular MH torsos really aren’t that different, as it turned out. The only major differences I found are the plug holes for the wings and tail attachments, which just serve as direct openings into the body anyway. That, and the shoulder joints are constructed a little differently due to the arms’ being entirely removable. My first attempt – on a CAM vampire – went pretty well:
It ended up being ‘strung’ together with wax cord, anchored in the bottom half around a cut-down dowel stuck through the tail plug and up top by just being tied together through the wing holes. Not very impressive, good only for light posing and not a lot of tension to it, but it did swivel and tilt, which was what I was going for.

Boy, was I in for some frustration when it came to the standard body, though. Observe the internals of a Cleo (upper torso on the right). There’s no access to the bottom half without drilling through the attachment points in the waist, and even then there’s nothing to really tie to. I drilled an additional hole a la the CAM’s tail plug, but as it turns out I don’t actually have to use it…but more on that later. CAM shoulder joints are entirely encased, but with the standard dolls what you’re looking at is the chest attachment points, and the shoulder joints are the discs visible just beyond those. There’s no access to the neck hole at all.

The same basically holds true for EAH ladies – this is a Cerise, upper torso on the left. The big difference here is…look at all that (comparative) space. EAH bodies are a little wider, but they’re also shorter. There’s less distance between the two sets of attachment points.
In both cases, the attachment points are: (upper) directly underneath the bust and (lower) directly above the hip joints. MH girls also have a slightly thicker line of plastic running up the back like a spine.

The guys are built more or less along the same lines, though they naturally have more open space. Check out Jackson here (upper torso to the right). It’s hard to see here, but you can actually see straight through his upper torso and out his neckhole if you angle it right. The discs of the shoulder joints are also much more visible.

Now observe Hunter (upper torso again on the right). Not only can his head actually fit inside here…believe it or not…, you can also see where his neck peg attaches and his hip joint. These guys are much easier to work with. Both of them have molded-on briefs that I’ll never not be amused by – Jackson’s are actually Y-fronts =p
In both cases, the attachment points are: (upper) slightly below the shoulder joints, and (lower) just below the waistline. They’re a little more spread out than the girls’ are, but still in the same general areas.
I took my trusty rechargeable Dremel (only two speeds, but both work and using the lower one is actually pretty good for egg-carving) and, having either candled or guesstimated on all the dolls what not to aim for, drew guidelines in colored pencil following the general shape of the ribcage. Cuts for the ladies were under the bust, a little lower for the boys. Afterward I switched to a sanding tip and bevelled the edges a little – inward on the lower torsos, outward on the upper. This was easier with the EAH bodies, as they have thicker plastic, but the end result works better on MH bodies, I assume thanks to their smaller size. A little fine-tuning with sandpaper and needle files later, I pressed some Model Magic between the halves to get a general molding for where ball joints should fit. You can see a finished one (later discarded) up there in the Cerise image, though that one had been sanded down by the time I took the picture. I love Model Magic – it air-dries, is easy to work with, doesn’t shrink, and sands like a dream. The longer you let it dry, the harder it will get, but it stays light and is great for things like cosplay horns or other things that really shouldn’t weigh a ton. You can also paint it easily with acrylics or craft paint, though it does come in a variety of colors. It’s also fairly inexpensive and you can find it at Walmart in the kids’ crafts section.
Unfortunately, much as I love it, MM really isn’t the best solution for this. Its overall texture is sort of foamlike, and it’s not terribly durable if you stress it…as happens with these joints the way I’ve done them. Thankfully I can go back in later and use something a little more solid if I decide to, though the MM works fine for now. I have an idea I could probably coat it with Loctite vinyl glue to up the durability slightly and give it a little extra tooth, so I may go back and do that.

Hunter got first dibs just because he has all that gaping space in there. There’s a lot of extra material on that ball to begin with, but I knew I’d be sanding it down quite a bit. I wanted it to fit, so the ball itself wouldn’t move, but would let the upper torso rotate or tilt without being too floppy.
 |
| Please, no flash photography. |
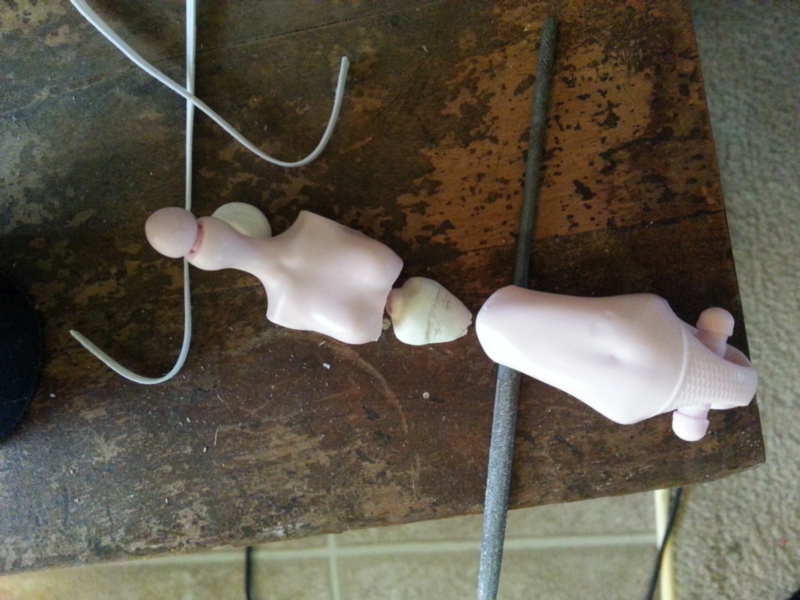
The end result isn’t 100% perfection and certainly ain’t professional, but it works. The torso twists more than it tilts. The neck pegs on most of these guys were removed because they’re getting nonstandard heads (another post later, muahaha), which actually made this job easier since I could tie off the rubber band there. That’s right…rubber band. A basic, office-supply-store rubber band, cut open and then cut in half to make two thinner strips. The halving was necessary since what I did was loop the band around the lower attachment points , ran it up through the sides of the center ball, and then up into the neck. Actual elastic would have more tension, but would lower the lifespan of the clay dramatically and I also found it a complete nightmare to try and get into the tiny gaps between the attachment points and the outside of the body mold when I attempted it. Waxed cord would have been a total joke.
 |
| insert deflating-souffle sounds here |
That’s a hell of a muffin-top you got going on there, Jackson. That’s also not the best cut job, and the balls were molded before these guys were trimmed and sanded further, but I digress. Like I said, a lot of extra clay to start with…

But it sanded down, and Jackson’s joint actually tilts fairly well. Not perfectly…but enough for some simple posing. The other bonus of the center joint here is it helps restore some of the height that’s been lost in the cutting and sanding process. Actually, Jackson may be a little taller than he was to begin with, but…it works. Both of these guys should be able to pose well enough in the end that they won’t look awkward…especially since they’re not planned to be naked =p
Trying the same method with the ladies proved to be a frustrating disaster, to say the least. I only got away with it on the CAM thanks to those wing holes, and thinking back, that was annoying to fiddle with as well. So retreating back to square one, I thought about it and came up with sort of a plan B:
 |
| an alien artifact |
That’s the thinnest-available craft store dowel rod trimmed down, then basically cut in half lengthwise. The same could probably be accomplished with toothpicks, but I didn’t want the tapered ends and didn’t have any handy to begin with, so dowels it is. The rod runs through the center of the clay ball, and either end is capped with a double thickness of a sheet of craft foam (again, Walmart, kiddie crafts…I think it’s the Foamies brand?) Pieces hotglued together to stiffen them up a little, the ends of the dowel punched through. Another dab of hot glue on the end to keep the foam on, the whole thing left to dry and cool thoroughly, then those foam ends pushed between the attachment points so the body itself will hold them in place, and…

Again, not perfect, but it’ll do for gub’mint work, as the saying goes. It has more tension than the practice joint on the CAM did, though much less tilt – basically all this one does is swivel, and the movement is a little stiff. Trying to force a tilt stresses the center ball too much (and that ball is a little larger than it needs to be, as tiny as it was to begin with). I do however have a version 2 of this in the works and I think I have that particular wrinkle figured out. Like the boys’ joints, this can also be taken apart again later if it needs repairs or upgrading, so all in all I feel like I’ve come out on top of myself here.
Next time, HEAD REPLACEMENTS. MUAHAHAHAHA.
No comments:
Post a Comment